Basic silversmithing…would you like to see how it’s done?
Come, I’ll show you then.
This Saturday I took the best course from a great teacher: Walt. The course was very small, only five students, so loads of personal help. The object of the course was work with sterling silver, to learn to cut, solder, shape and polish rings and to solder holders for bezel stones onto those rings, to fit the stones and then to actually make an odd shaped holder for an odd shaped stone from scratch.
Here is my workbench station with the tools I used.
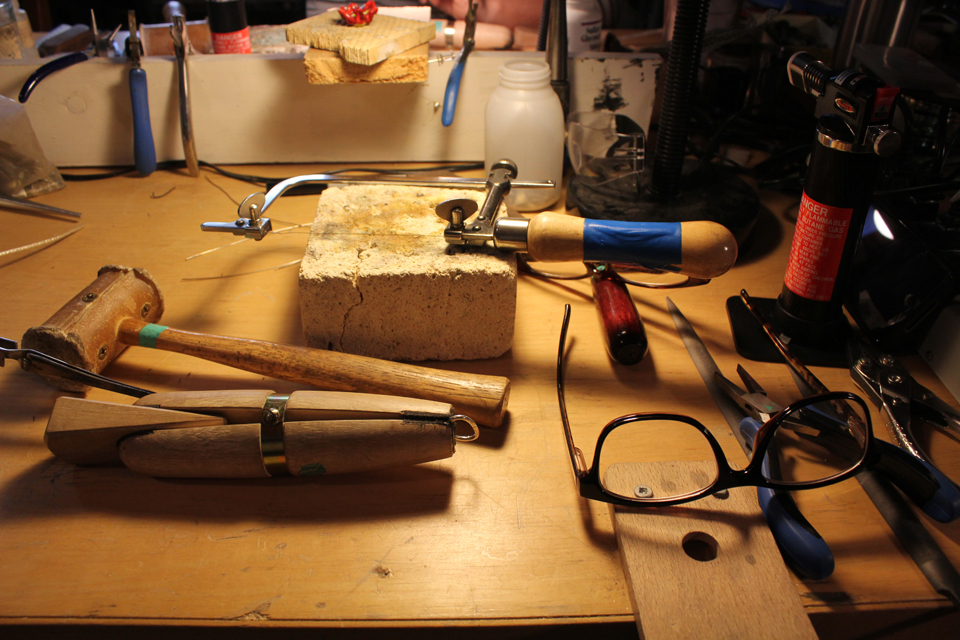
There don’t seem to be a lot of tools involved, just some basic tools and, if you’ve ever done anything like stained glass or even used a kitchen torch on your creme brulee, then you’ll be able to handle silversmithing, but I’d advise to take a course, (if you’re in the Lower Mainland, I’d really recommend Walt’s course for personal assistance, friendliness, camaraderie and general good time.)
Silver seems to come in these lengths, like wire. Some are plain and some are patterned. Some are flat and some are rounded. Chose the one you like. I chose a plain one for my first ring, but later found out that the patterned ones were infinitely easier to bend.
To make a ring, first twist the wire around a tool called a mandrel. It is a long metal ring form which tapers smaller and has ring sizes printed on it.

Then the piece of silver, which will be your ring, is cut from the length using a small jeweller’s saw. The saw needs to be fitted with a blade and the blade needs to be so tight that it sings a note when twinged. This is easy to do. It’s also easy to break the blade…as I found out almost right away…you don’t need to put pressure on the saw at all because the blade will simply cut thru the silver without much force. The rule of thumb is if you’d like a size 7 ring, cut the silver at about one size smaller, so at the size 6 for a size 7 ring, because you always end up cutting a larger piece because it’s impossible to shape it exactly at the size you want. Below a size 5 ring subtract only 1/2 a size instead of a whole size. (Trust me, my first ring, which should have fit my middle finger is too big for my thumb!)

What you have now is a round of silver with crooked ends. Use parallel pliers and bend the ends apart. Use a fine file…we used #4 and #2 files…to file the ends so that they meet perfectly in the middle.
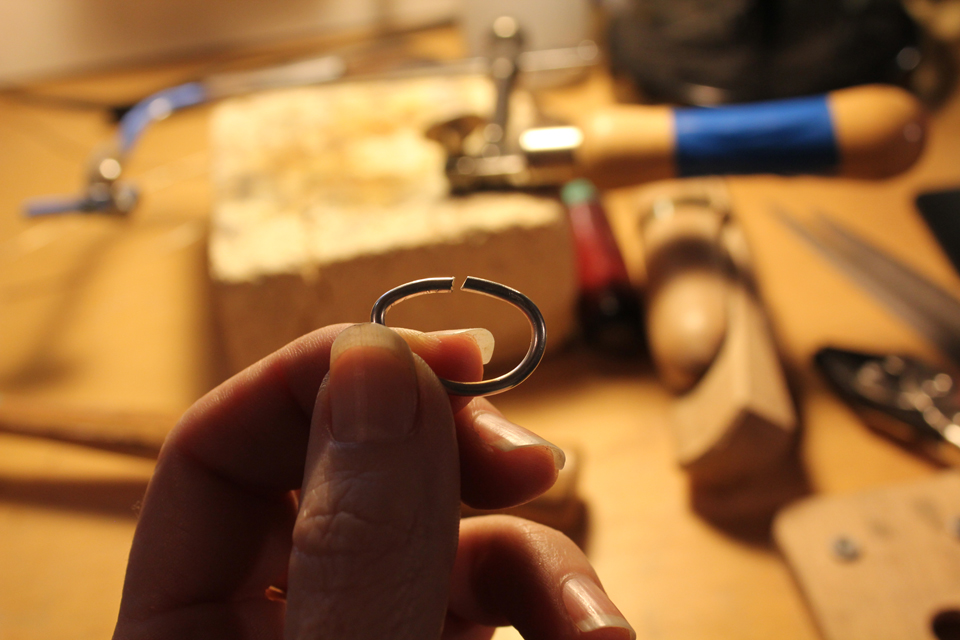
This is best done in this kind of a holder because it’s not easy to hold the silver in your hand while filing.
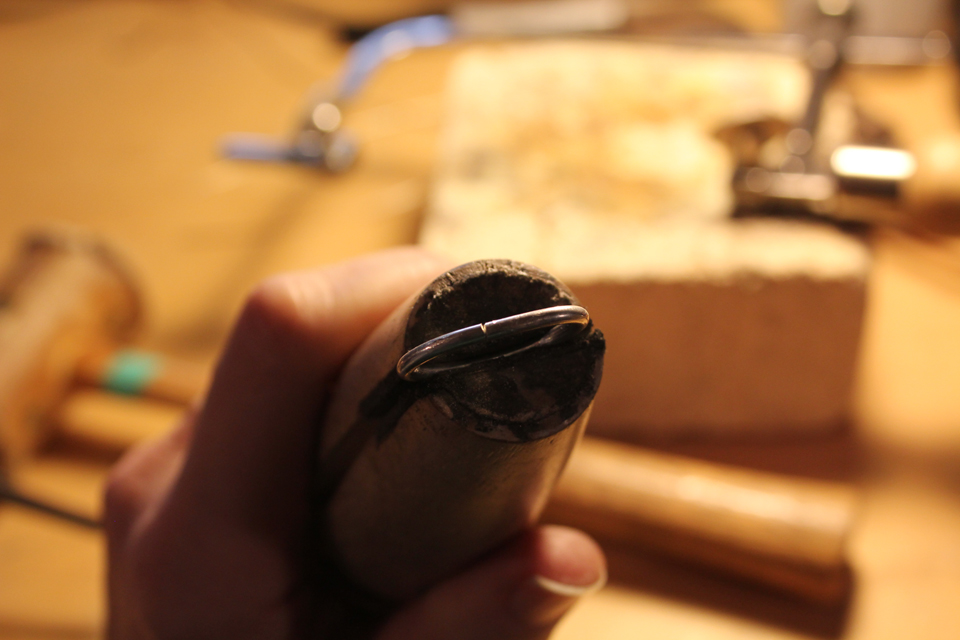
When the ends are smooth and even, bend the ring so that the ends overlap and gently bring them back together keeping a slight tension on them, as though they want to be overlapped but are forced up against each other.
Now place your ring on a fireproof brick and get ready to solder.
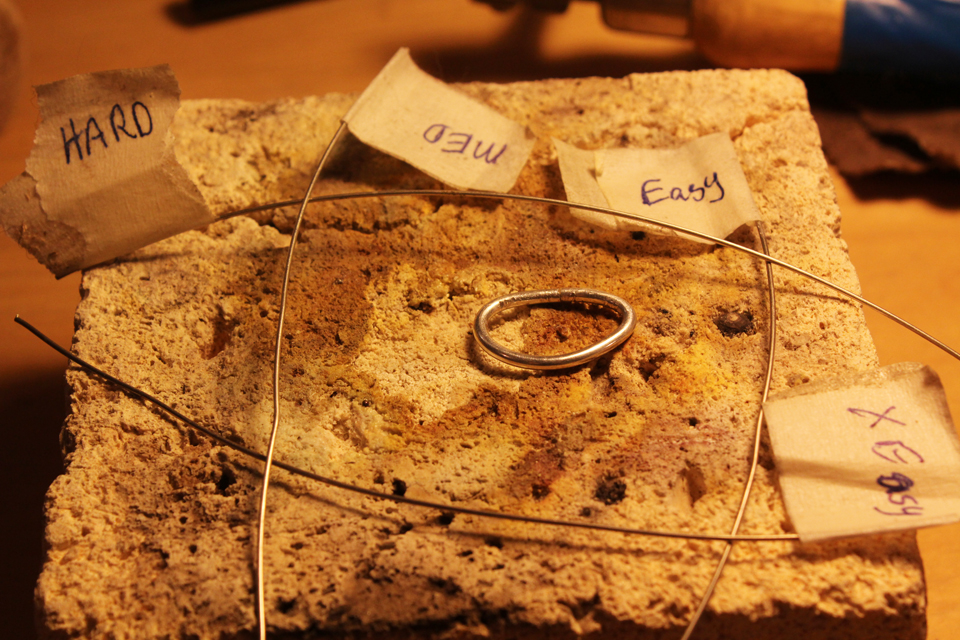
Solder seems to come in four wires. They range from hard to extra easy. Walt advised that you cut yourself a small length but stick a tape on it immediately identifying the wire because it will be impossible to tell the wires apart without the label.
The rule is that you start with the hard wire but if you want to add anything else on your ring, like a bezel and a gem, then the next soldering will be with the medium and then the easy and finally the extra easy.
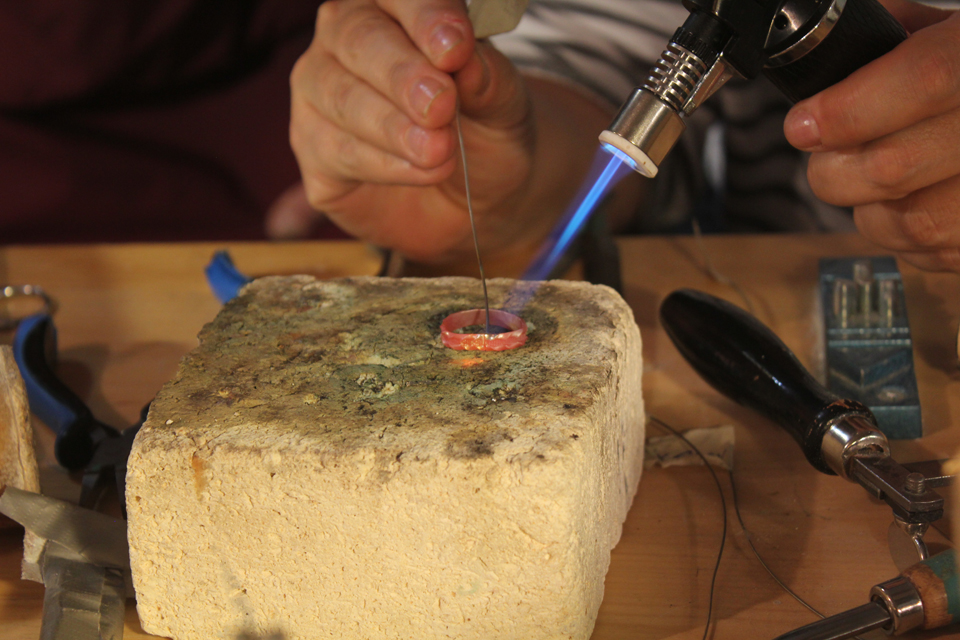
Now comes the fun stuff…the soldering. drip a drop of flux on the joint and also a little all along the length of the ring. Carefully turn on the torch and heat the ring up. Here is my fellow student getting the ring to the correct rosy gold temperature. When your ring is so rosy, focus the torch on the seam and touch the solder wire to the inside of the seam and the heat will draw it thru to the outside.
Then plunge your ring into cold water using small pliers to pick it off the brick, and put it into a warm “pickle” in a crock pot. That’s a very weak acidic solution and cleans the ring. After fifteen minutes, lift the ring out, rinse and fit it back on the ring mandrel. Hit it sharply with the rawhide hammer until the ring is round and sits nicely on the mandrel. Do not hit it in a downward motion because the silver will stretch and your ring might be too big. Now you have a lovely round ring and you’re ready to polish. Polishing can be done with your dremel tool and some polishing wax.
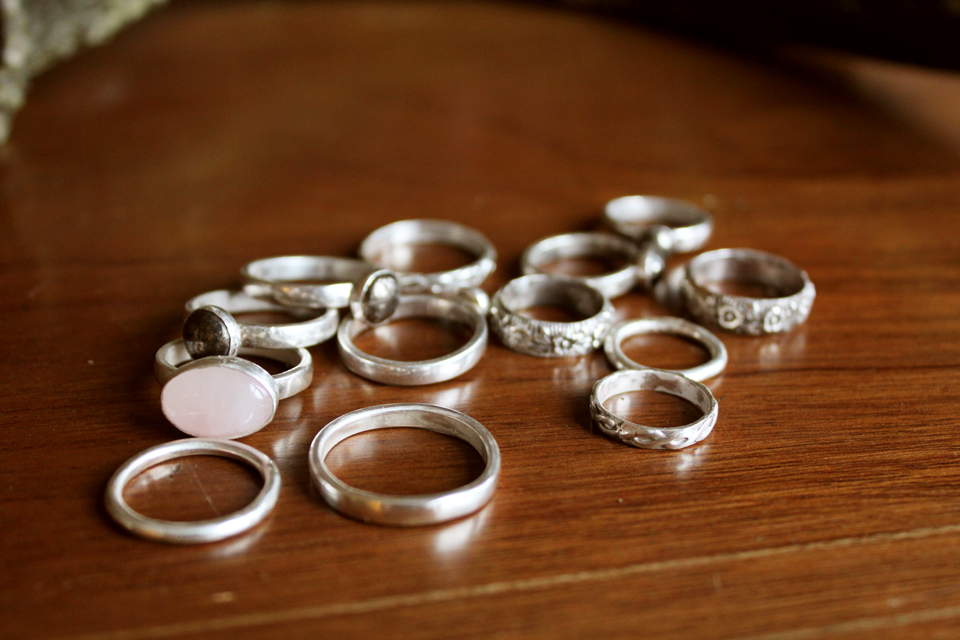
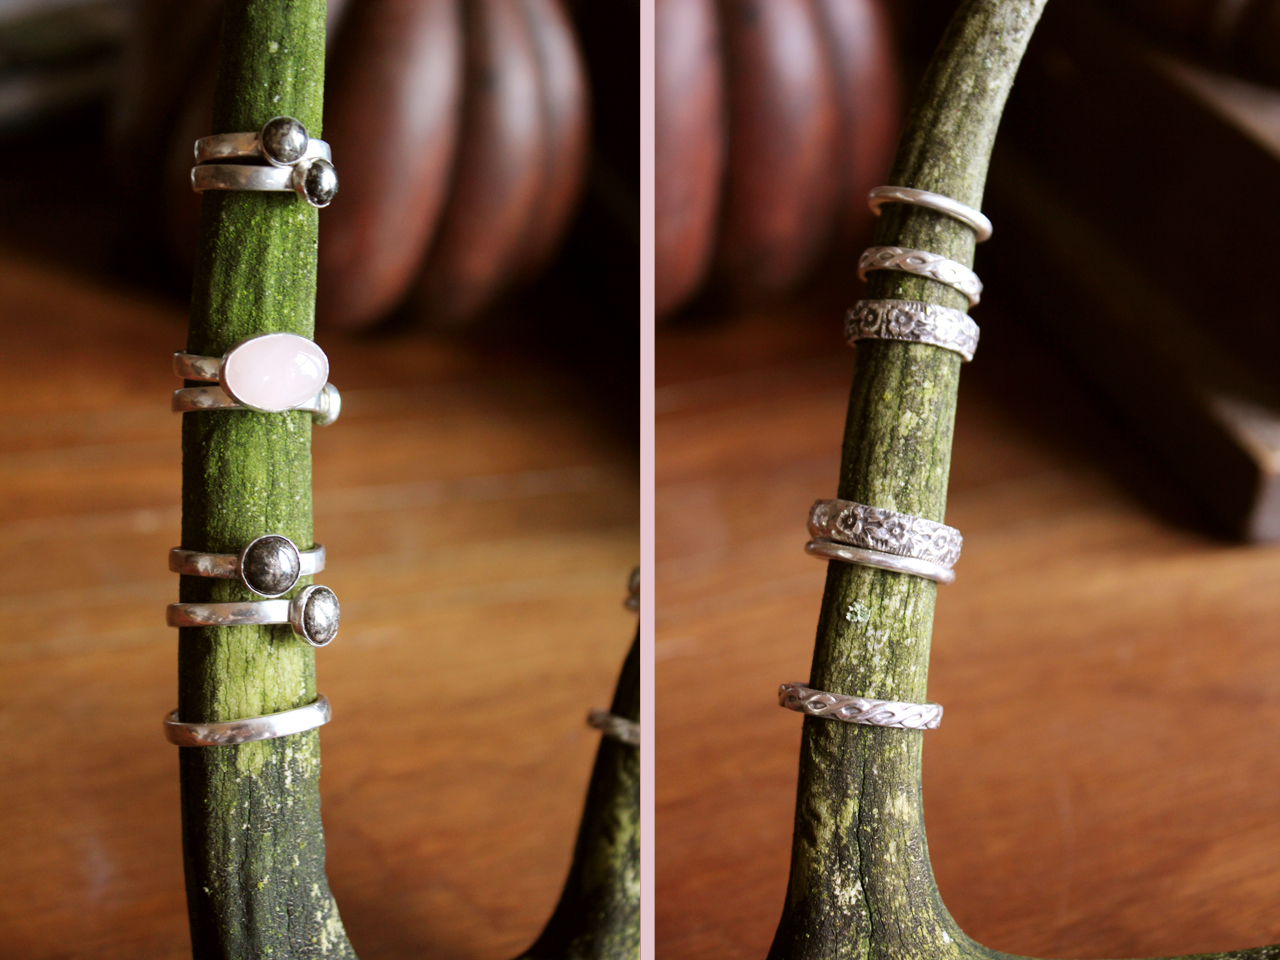
Here are the first few rings I made. The first ring took me an hour! But the subsequent rings took me much less time.

The next type of ring I made was a round band with a bezel and a stone set in it.
The ring started out the same way for the band.

When the band was finished and pickled, there was no need to polish it. I chose the joint to solder the stone to and so filed a smooth, flat surface there for the bezel to fit.
There is a nifty tool for holding the band upside down on the bezel on the brick to solder the two together, but mostly the tool heats up and gets in the way. If the flat part is truly flat it balances on the bezel easily.
So now it is important to remember that the band was soldered with the hard wire and so the bezel needs to be soldered with the medium wire.
The the same process of pickling and polishing has to be done before the stone is fitted into the bezel and a burnishing tool is used to gently bend the sides over the stone to keep the stone in place.

And that’s how I made these!
I used iron pyrite and a rose quartz for my stones. I made some tiny rings for Chloe’s tiny fingers, I made us matching rings, I made pinky rings, stacking rings…well, I had so much fun. 😀 I can’t wait to buy some supplies and try again. 😀
And I absolutely plan to be a repeat offender in Walt’s class at least one more time this spring.

Sharing with Mary at the little red house and Ramona at Create with Joy. 🙂

Patty/BC
Absolutely beautiful!
createwithjoy
Awesome job Veronica – thanks for inspiring us at Create With Joy!
Rosie Baillie
That looks like a lot of fun and the rings you created look lovely.
Veronica
Thank you Rosie, it was so much fun. 😀
Eileen
Beautiful rings and creations. Well done! Have a happy week!
Veronica
Thank you Eileen. Hope you are having a lovely week. 😀
Heather
Veronica, those rings look amazing! Kudos to you for trying something like that. Love them!
Veronica
I’m so glad you like them. Thanks so much Heather. I’m looking forward to making loads more. 😀
Becca
You are just so crafty! I love the little silver bands with the designs. What fun!!
Veronica
Thank you so much Becca. This was way too much fun. 😀
Joanne
Fantastic!
My Silversmith tutor taught me to cut solder chips – which almost always jump out of the joint at the wrong moment!!
I am going to try your technique of touching the solder strip to the joint next time I make a ring.
You make it all look so easy Veronica.
Veronica
Oh Joanne, I can’t imagine solder chips! Touching the wire to the hot surface and letting the heat pull it thru seems to be working like magic. And it seems easy to file smooth after. I was really worried about making mistakes, like when I use Robert’s welder. I make the best unintentional splattered insects! LOL. Let me know how it works for you. I can’t wait to collect all the stuff I need to make more rings. 🙂
Mascha
Amazing rings! Have you enclosed the stone yourself or there are these parts so ready today?
I have all these tools very familiar from the workshop of my grandparents. He was my grandfather
http://www.amazon.de/Erich-Lenn%C3%A9-Goldschmied-Hagener-Silberschmiede/dp/3926242035/ref=sr_1_1?ie=UTF8&qid=1390844784&sr=8-1&keywords=Lenne\c+Erich
He has mainly newly perfected the technique of granulation ( http://de.wikipedia.org/wiki/Granulation_%28Goldschmiedekunst%29 ) – I liked as a child watching when he stocked the tiny beads. For this he had built a small apparatus itself – he has built at all very much itself, of galvanization to photo lab … and there were always aesthetic shapely commodities, in his own way.
I have not inherited the skill of the hands 🙁
Good luck to you with further learning
Veronica
Wow Mascha, that’s amazing, and wonderful that you have that heritage with your grandfather. Thank you for the links, I’m going to go investigate them. 😀
Mascha
Now that is not much, there is little information on the web … here a ring to which I remember (but of course, all no longer belongs to us)
http://www.galerie-kunststuecke.de/de/Rubriken/Schmuck/Granulierter%2BGoldring%2Bmit%2BAmethyst%2BErich%2BLenn%C3%A9%2BNr2610.html?lang=de&cmd=&n=1;3015,1;3023,1;2610&
His year of birth is here not correctly (really 1893)
I’ll tell more in the next “Random5”
Veronica
Gosh, that’s so beautiful. I hope there’s a way you can get some of your grandfather’s creations back again one day. 🙂
daryl
seriously there is no end to your talents …
Veronica
LOL, I hope not! Too much for me to try to master still. (I use “master” in the loosest possible sense) 😀
Sara v
Amazing!! I love the pink stone and the flower pattern, quite lovely 🙂
Veronica
Thank you Sara. I chose those stones on purpose according to C’s crystal healing books. I’m drawn to iron pyrite for some reason. My grandmother used to say that I’m half magpie…lol. 😀
Valerie
Wow that was so interesting. I did not know how these were created. Valerie
Veronica
Me neither Valerie, until I took that course. Before that, I only had experience with stained glass and creme brulee…lol 😀 It’s not that hard, you should give it a try.
dawnsrays
OMG, that is fabulous! what a terrific class~ I have always been a bit interested in smithing. When we lived in Charleston S.C I loved all the iron work and thought if I lived in another time I think I would be a black smith. I love fire and pounding on all that metal to come out with a piece of art! wow, what a thrill.
You do good work, girl!
~Dawn
Veronica
Thank you so much Dawn! I already had a talk with a friend who is a farrier and has access to a forge and as soon as I learn the lost wax method there’ll be no stopping me! Lol. You should give it a try Dawn, you’d be fabulous at it with your artistic sense. 😀
woolf
this is seriously impressive, veronica!
i’d always wondered a little, and here it is.
thxs for sharing.
n?
Veronica
It’s not that hard! 🙂 I always thought there was some magic to it, but actually it’s just following some simple steps and getting some experience. This class was fantastic because it was experiencially based instead of one project based, so once I got the hang of that first ring, I could just make away until the end of the class. Now I want to make some more. 🙂
vastlycurious.com
I would love to do this! So interesting. I have thin wire wrapped gold and silver around stones and gems but never done any soldering ! I have never seen the process and thanks for sharing it! Maybe you have a new calling?
Veronica
Maybe! I loved it and can’t wait to go out to buy some supplies. I’ve already got some ideas in my no-limits, butterfly brain. You should try it Kathryn. I thought there was so mystery to it but actually it’s just a process. And it’s fun. 😀
vastlycurious.com
It looked absolutely satisfying!
Nancy @ A Rural Journal
Is there anything you can’t do well? Gorgeous creations — I only wear silver (no gold) so these rings would be something I’d love to have. xo
Veronica
Aw, thank you Nancy. If that’s the case then when OI get a bit better and more practised and these pieces stop looking quite so “homemade” then I’ll send you one. 🙂 (you might have to remind me…butterfly brain) 🙂
dianecayton
So pretty, Veronica! I would love love love to take a class and learn to do this.
Veronica
You should Diane, it’s not that hard.
Mosaic Magpie
This looks like it would be so much fun!!! I have tried Stained Glass and soldering…..need to try this too!
Thanks for visiting me and leaving a comment, so I could find you!
Veronica
You could you know! I did a lot of stained glass and so wasn’t afraid of the torch and solder. Let me know how you get on if you do. 🙂
Pingback: Here we are at Friday random again! |
Pingback: Silversmithing advanced class...spinner rings |