
Silversmithing advanced class…spinner rings
So this was the most fun!!!!
Remember when I took the basic silversmithing course a few weeks ago?
Remember I told you I would be a repeat offender in Walt’s class?
Well, guess what? Walt decided to hold a spinner ring class with slightly more advanced techniques and I jumped at the chance.
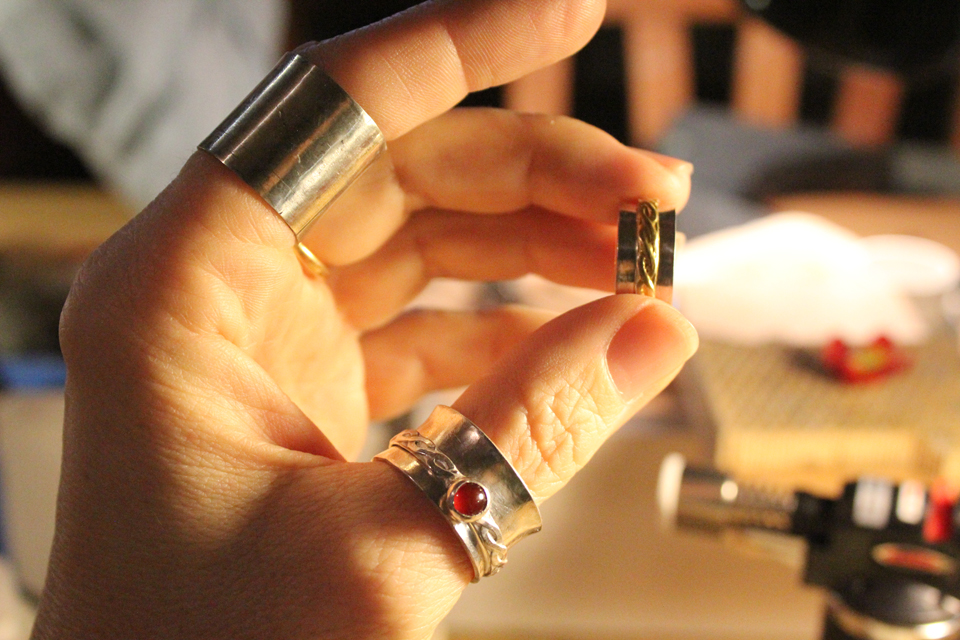
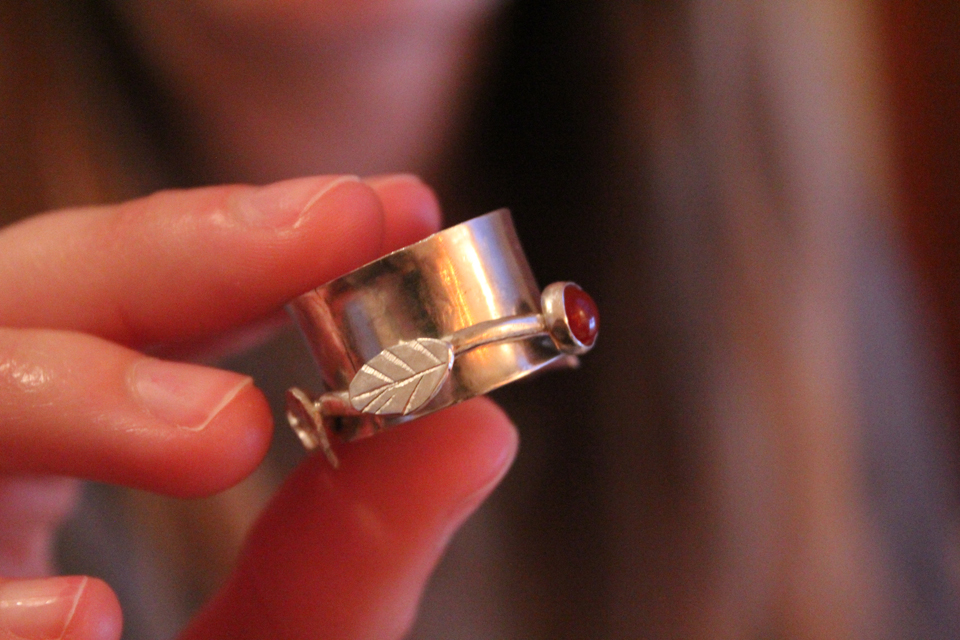
Do you know spinner rings? Fun, fat rings with an outside ring which can spin freely around the inner ring. So lovely, so handy when you’re nervous, so dress up unusual when everyone is wearing plain old “rings”…so what I have to make right now. (Below are a couple Walt made for demonstration.)
But you know me…I’m so not colouring within the lines, by the way…lol.
So come see how these are made, it’s not too hard, I promise. But I would still recommend a class before you try any silversmithing on your own and, if you’re in the Lower Mainland, you can’t do better than Walt’s almost one-on-one, private studio classes, and, he’s running a basic class in a week or two again.
So this ring needs a thicker inner ring which means I got to design, measure and cut out a custom sized piece of silver.
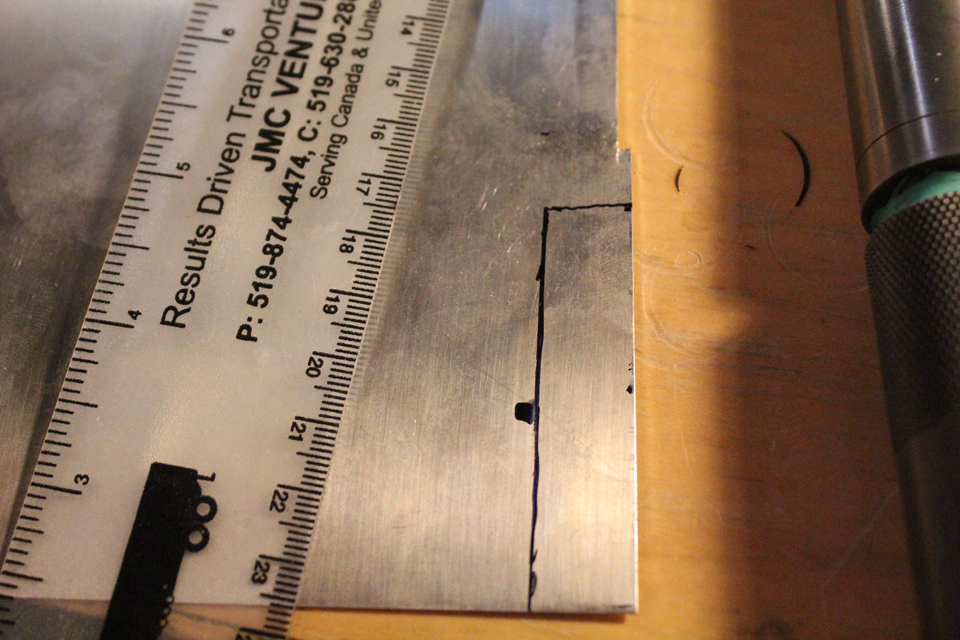
Silver is pretty easy to cut out using these metal cutting shears at this stage, so a saw isn’t necessary for this step.
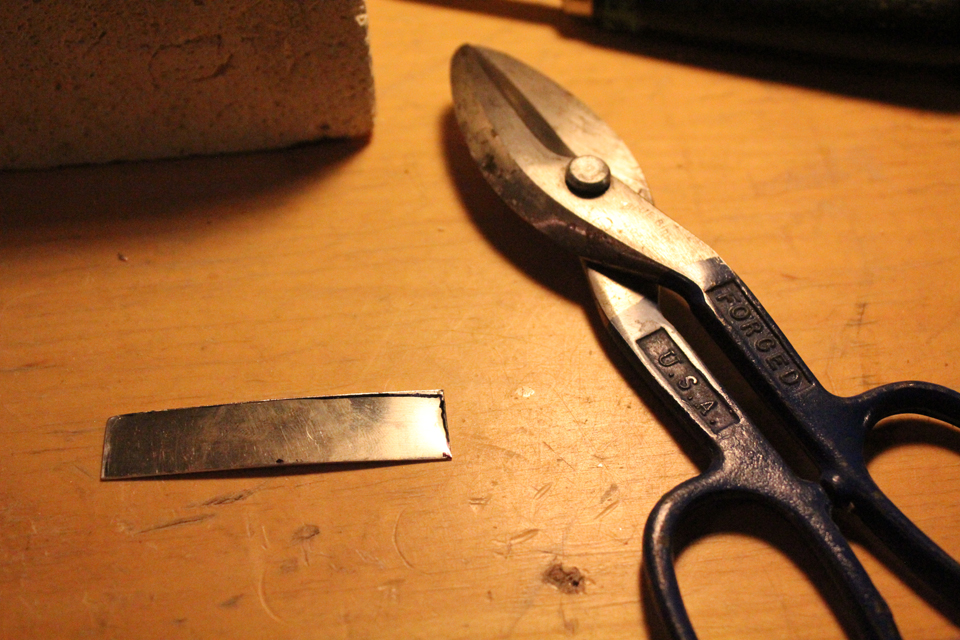
Next, that whole palaver of adjusting the ends so they fit completely smoothly and snugly begins with endless filing.
Remember, if you decide to become a silversnmith, it’s useful to say, “I love filing…filing is my friend!” over and over again. You can also see how badly I cut this piece of silver with one end slightly wider than the other. You guessed it…more filing. 😀
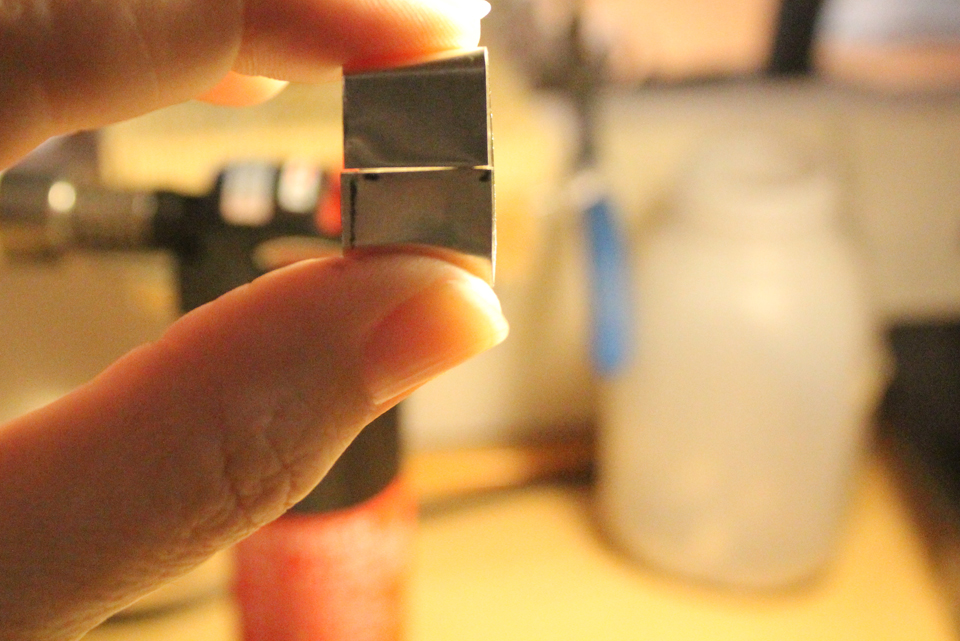
I’m skipping over the basic flux and solder of the inner ring…you can refer to the earlier post…but let’s just say that after the ring is filed and soldered and in the “pickle”, it’s time to begin work on the outer ring, which will spin around the inner ring.
Now let me tell you why Walt is one in a million.
I think I said something like, “Walt, I’d like to make a wavy branch and have a jewel on that branch in a bezel, kind of like a flower, and I’d like some leaves and maybe a bird on that branch, and I know that this class will finish by 4:30pm and I know that this means hours of custom work which I don’t know anything about, and I also want to make a second spinner ring for Clove, which I haven’t even designed yet but it won’t be simple,…but it’s what I really want.”
And Walt said, “sure, go ahead!” And then! He encouraged me in my crazy designs and showed me short-cut techniques and introduced me to new tools.
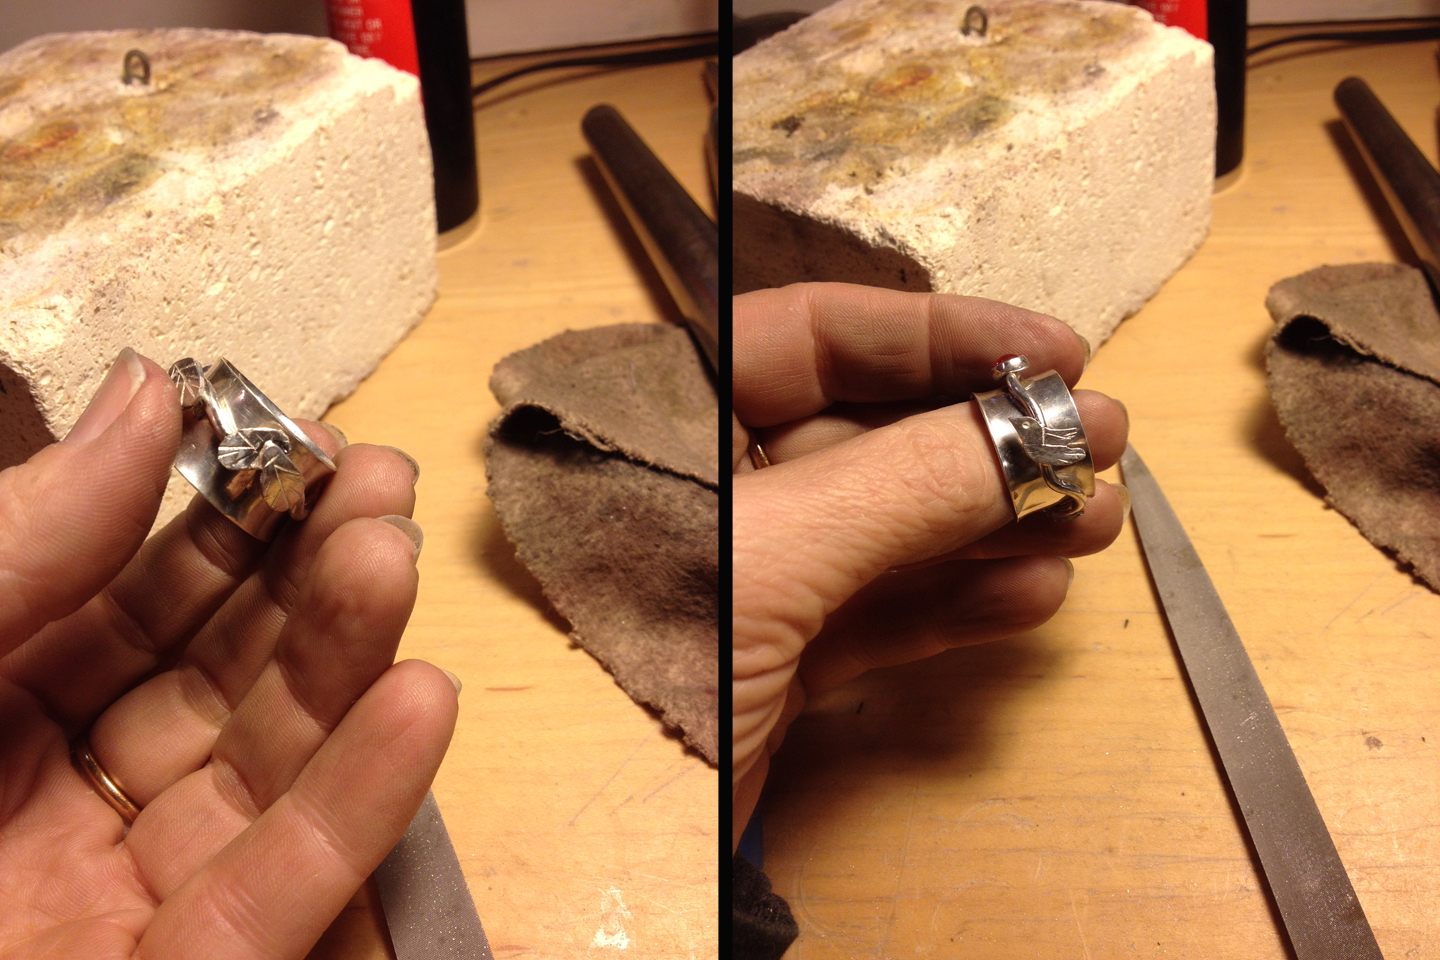
So my outer ring began with a length of silver wire. I cut it to two sizes larger than my inner ring size and, after soldering it together, I bent it into a wavy pattern. Then I filed a smooth spot on the branch and soldered the bezel cup to it.
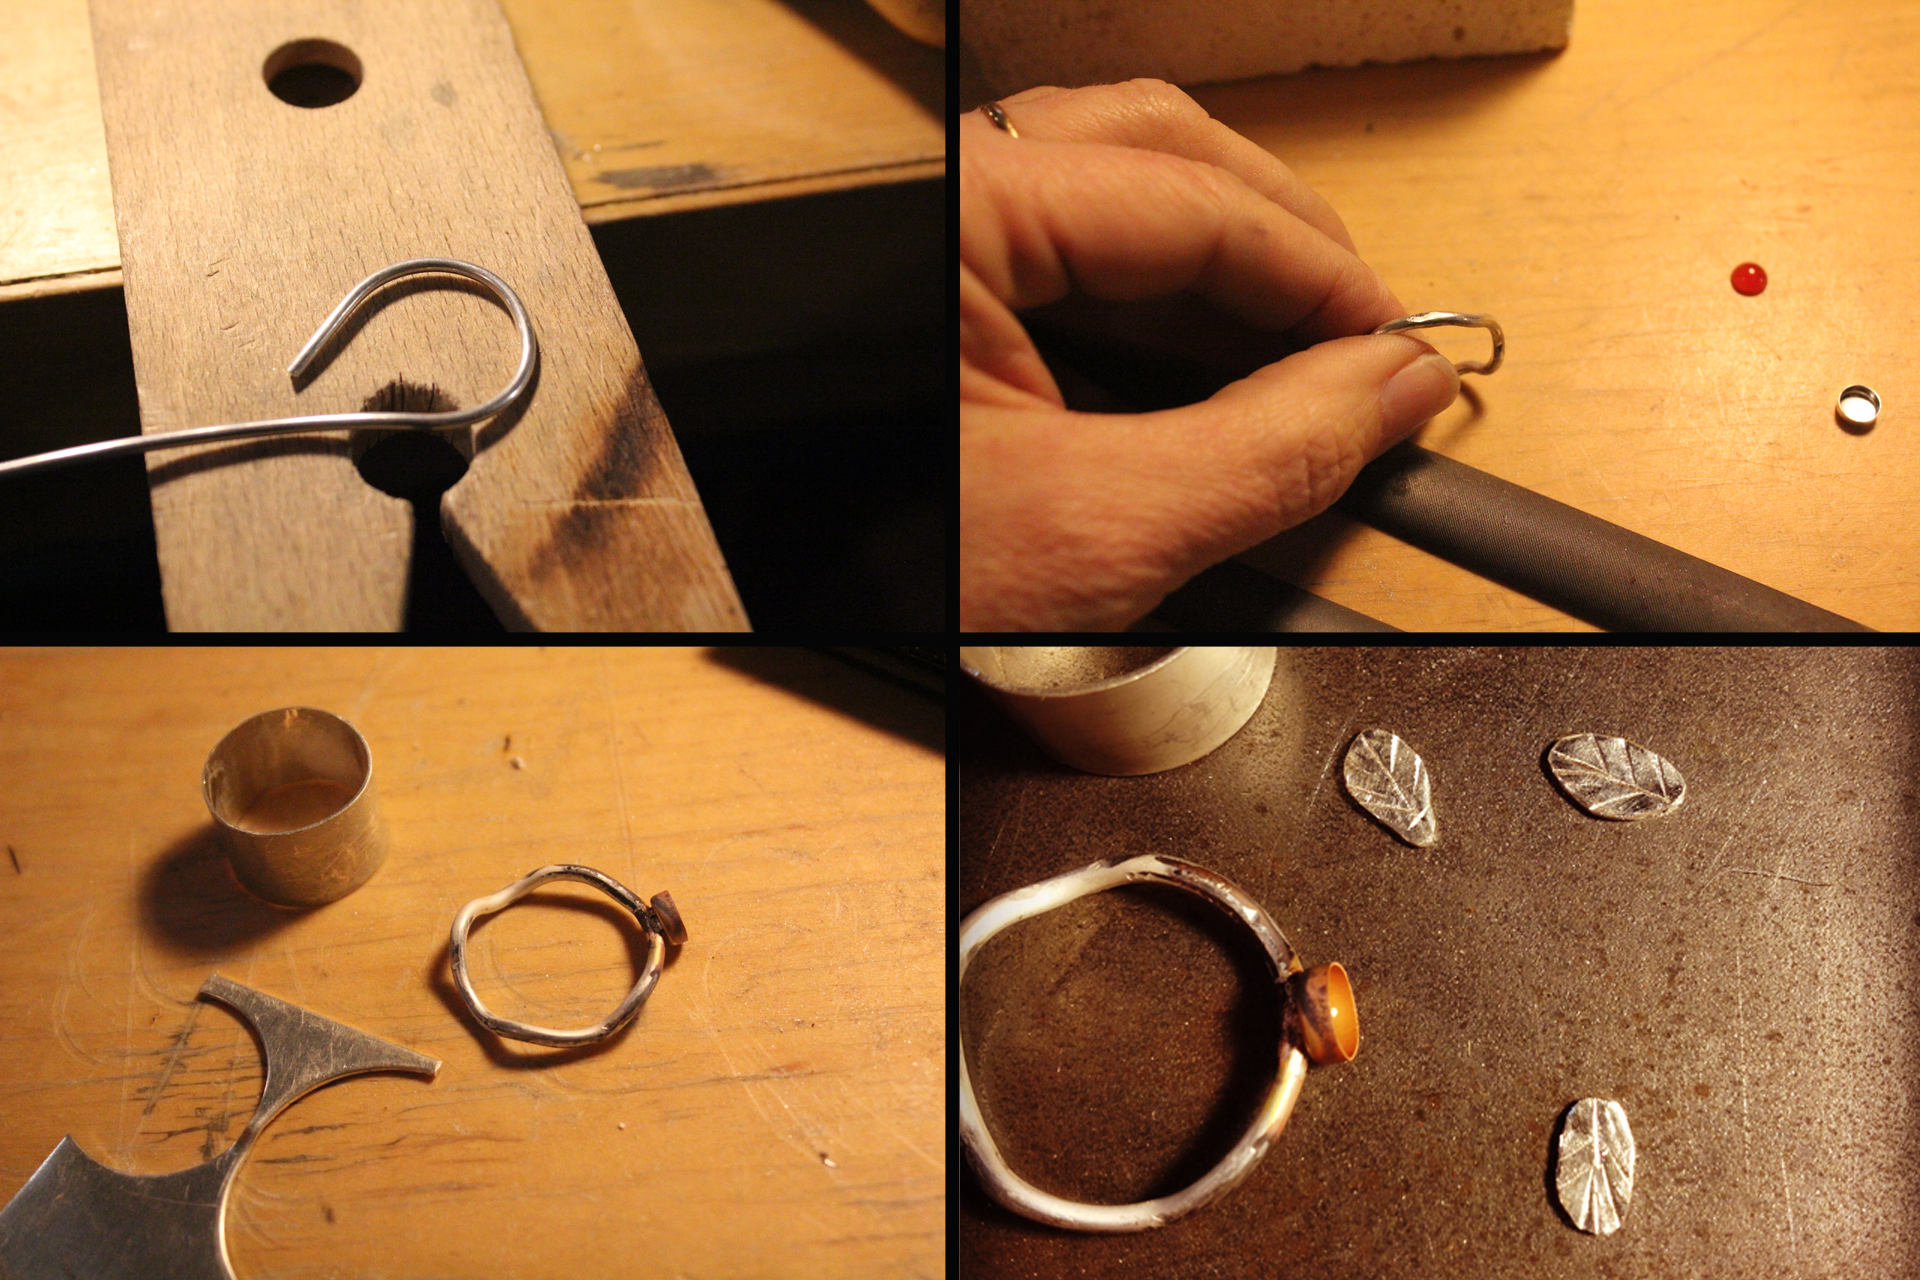
Next I thought about the leaves. I took a little piece of silver, drew three leaves with a sharpie and cut them out with my saw. Then filed them smooth and to the irregular shape I wanted, and used a heavy sort of screwdriver thing and my rawhide hammer to make the leaf veins on the leaves. You can see by the tip of my finger just how tiny these leaves are.
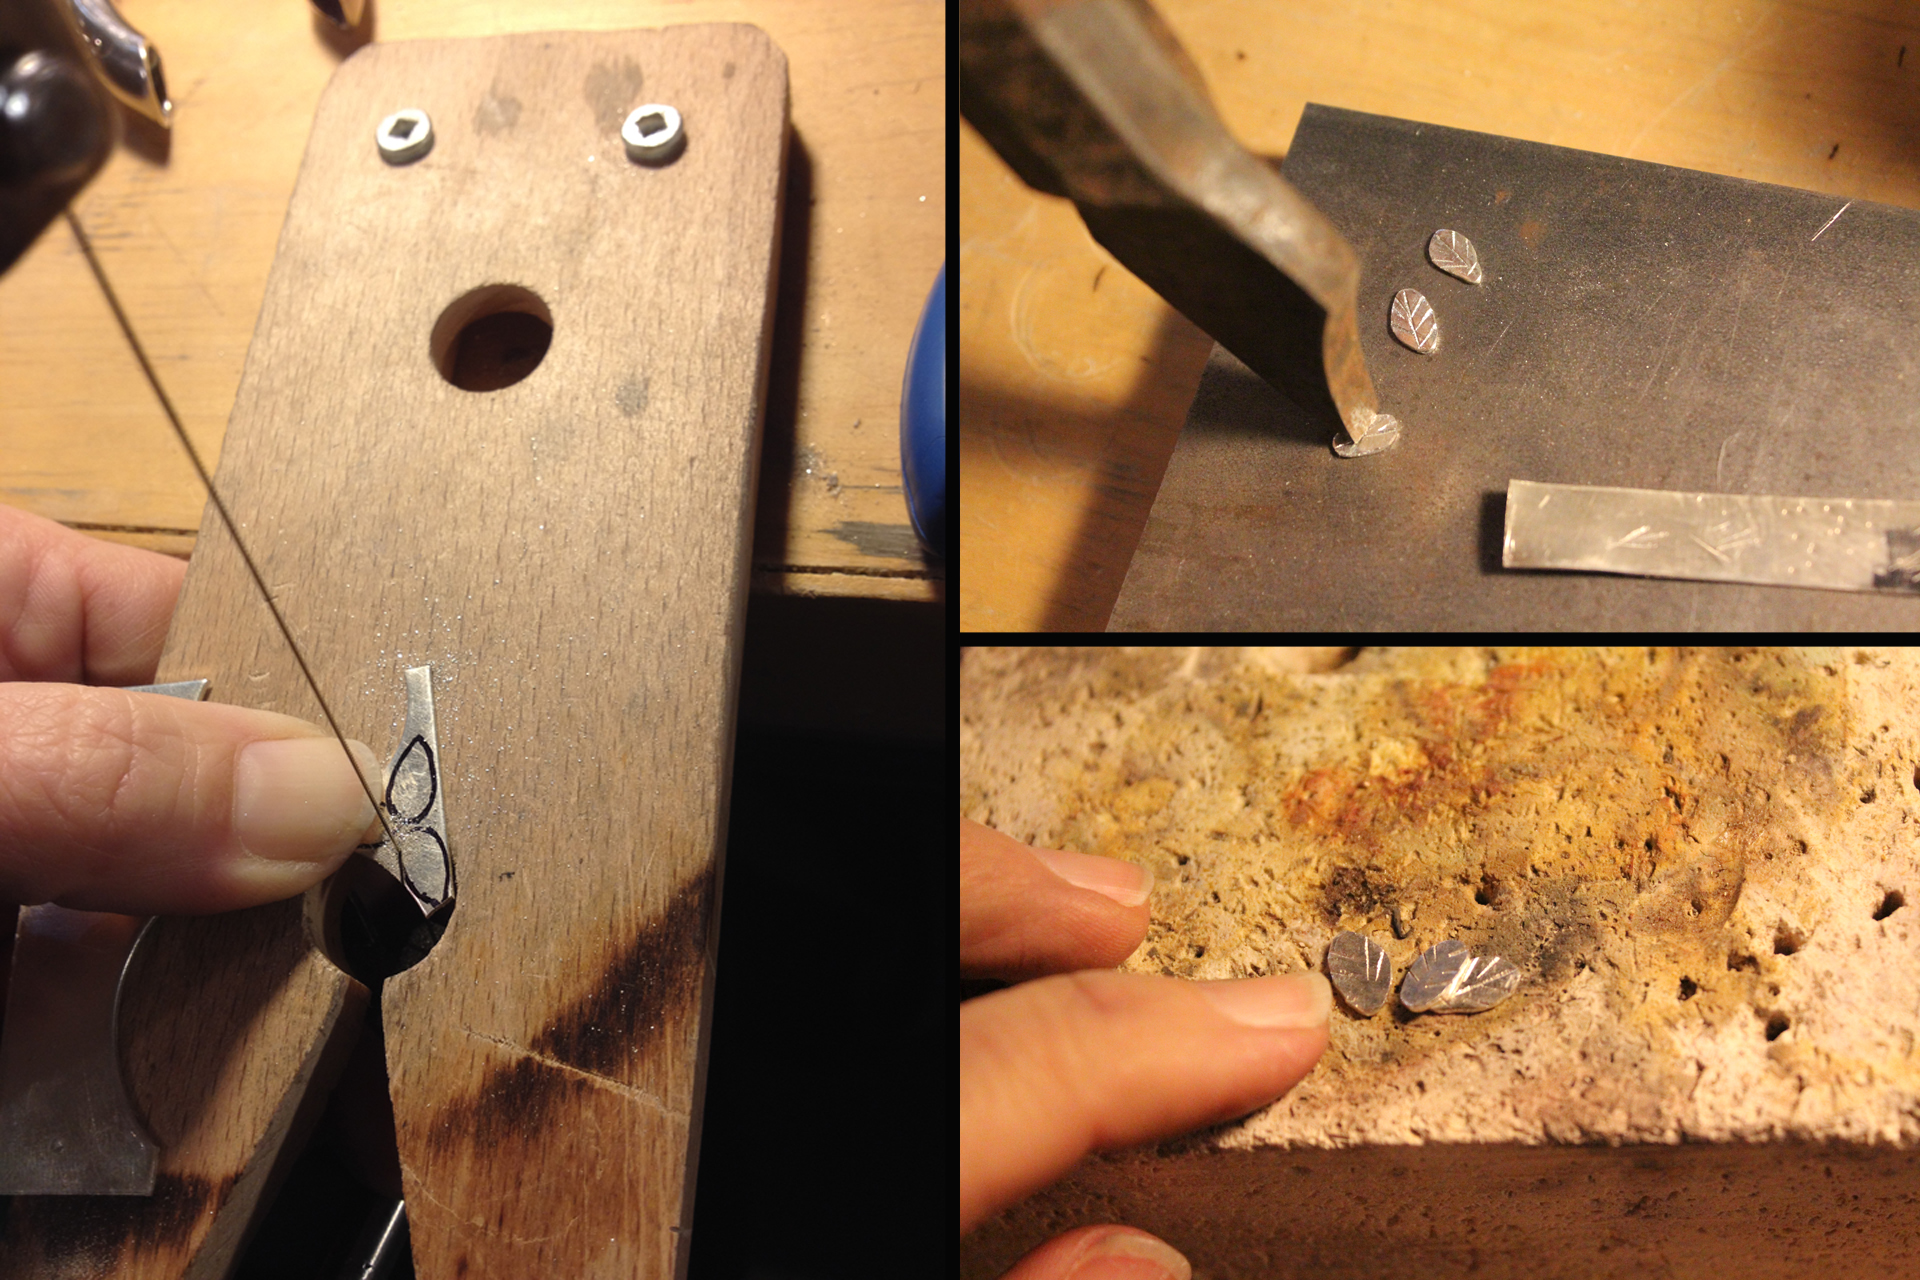
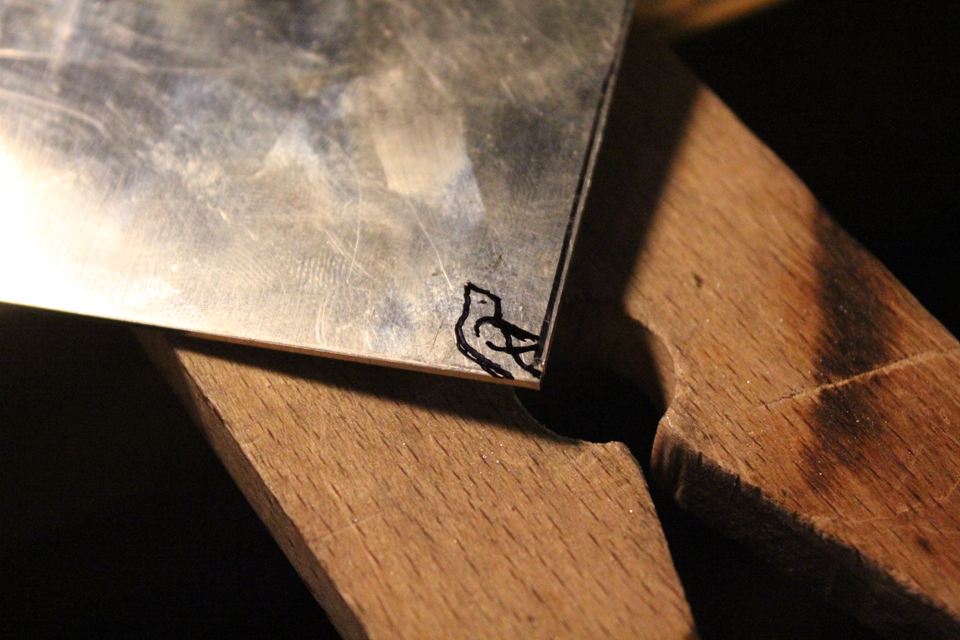
Then I took the edge of a thicker gauge sheet of silver and drew a tiny bird on it and cut it out with my saw.
Then the nightmare of soldering all those bits on my “branch” outer ring began. Whew, they took a fair few tries to get that straight remembering to use the solder in the hard, medium, easy and extra easy steps so not to melt the previous soldered piece with each subsequent heat-up and solder.
From such humble beginnings as scrap bits of silver to fitting the little carnelian gem took hours but I was so proud to be using the burnishing tool and doing that almost final step of fitting the gem.
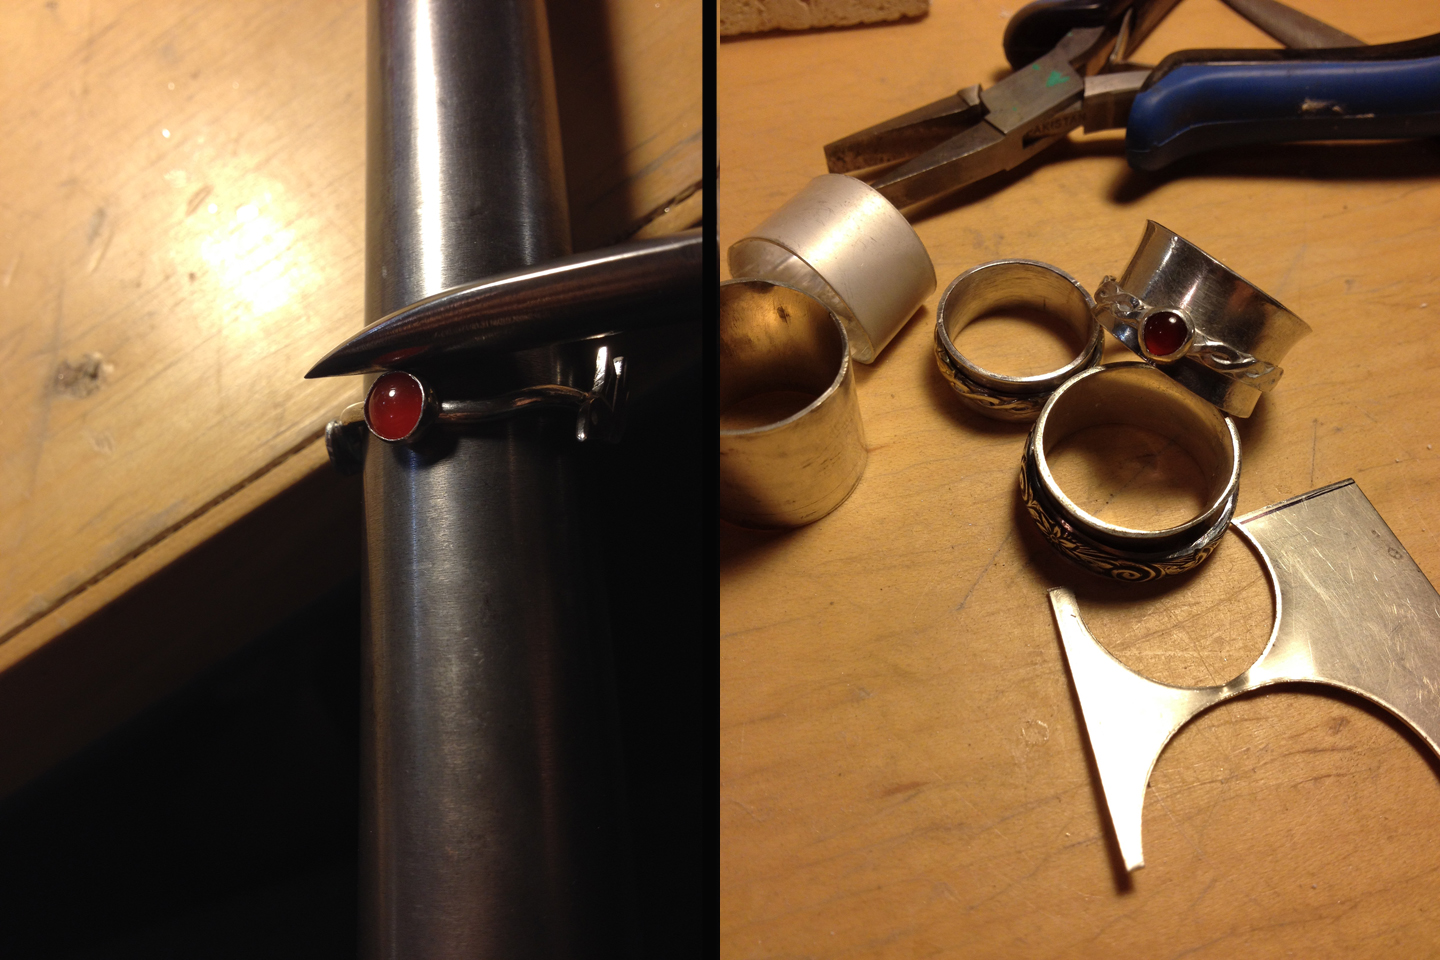
The very last step to my ring involved slipping the outer ring over the inner ring and gently hitting the ends of the inner ring with a ball-shaped tool to spread them out and keep the outer ring trapped on the band of the inner ring. I’m sorry but I was so excited to do this that I forgot to take a photo. 🙁 My bad.
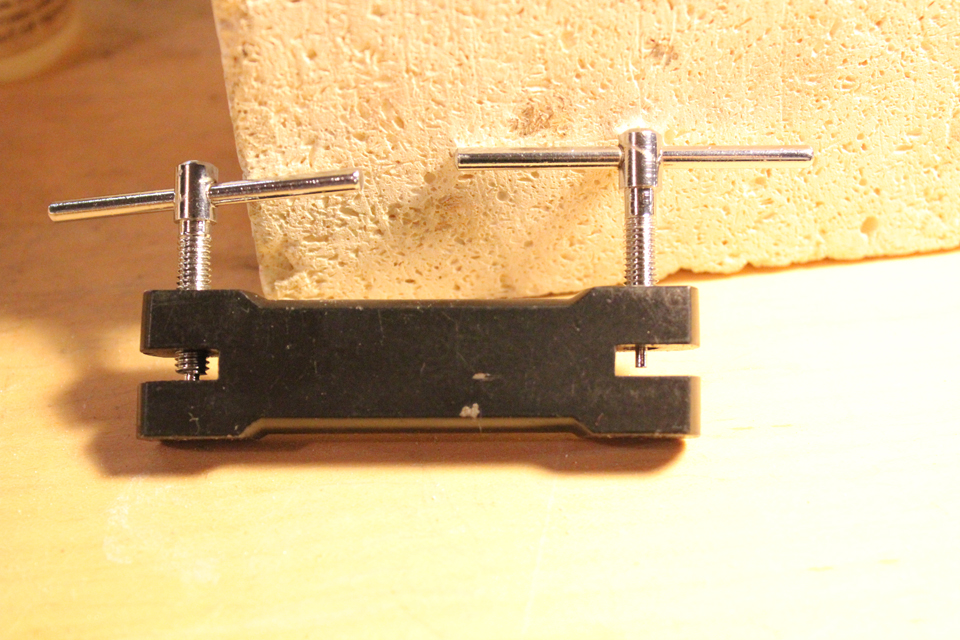
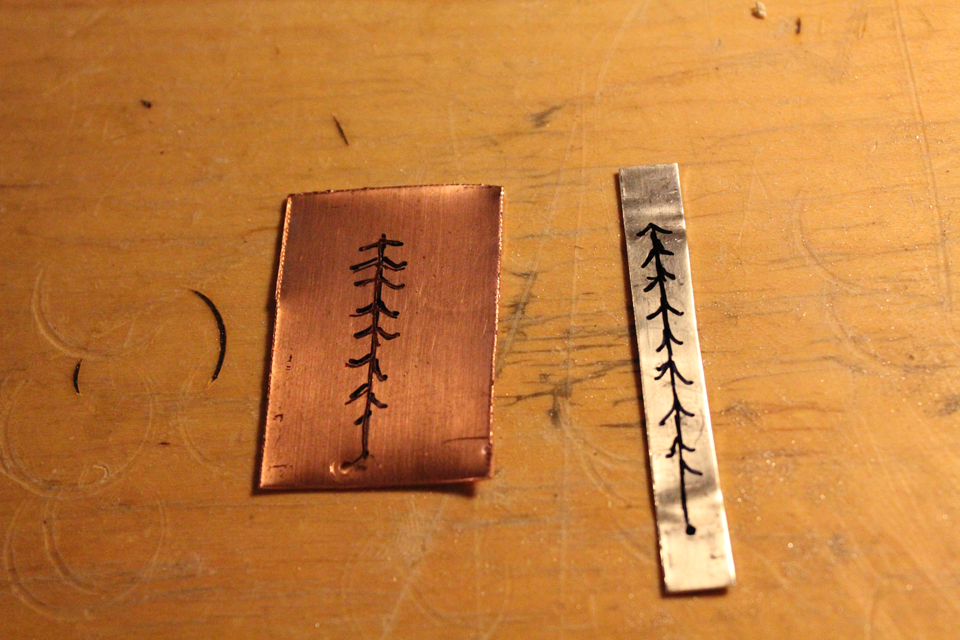
For C’s ring I wanted to make her a tree. Not just any tree, a tall, majestic and slim sitka spruce. Walt suggested I learn a new technique or sawing inside a bar of silver, like lace, or cut work. I knew the minute he said that, that this would be the best ring for C. The way to do this is by using this new tool to make a small hole thru the silver and then treading the saw blade thru the hole and gently sawing out the tree shape.
So C’s ring began the same way with a bespoke inner ring, a bar of silver, shaped, filed and soldered together, filed some more and polished, and the outer ring began the same way as the inner, with a bespoke bar of silver, slightly narrower than the outer ring, shaped to make sure the size was correct and then flattened out again.
As with everything, practice makes…well…a better mess the second time than the time before, and after a prototype on some copper, the bar of silver was relatively easy, even if very time consuming. (by the way, filing silver must be a good work out for your upper arms because mine are killing me!)
I got home around supper time and gave C her ring and showed her mine. She absolutely loved them both and immediately gave me a big hug and Instagramed it. LOL. I’ll take more photos in the day time so you can see the rings better but if you have any questions at all I’ll very happily find answers for you.
Oh, and by the way, C has asked for a sitka spruce necklace now…lol. A mother’s work is never done. 😀

Sharing with Mary at the Little Red House and with Create with Joy and Amaze me Monday

Mascha
Wonderful what you’ve created there in such a short time! My grandfather would have appreciated you …
(About your linkin up I just learned of the death of blogger Judy Haughton-James, which just makes me very concerned, because I have not know about her illness, but I knew her from the blogger world)
Have a great new week
Veronica
Wow, thank you Mascha. Your grandfather was a real artist. About your blogger friend’s death. SO sad and much sympathies to you and to her family. The more we reach out to people on line and befriend them, the more the chances of sharing in their sadness, isn’t there? But also the more the chance of sharing their happiness, so that’s good. It looks like her daughter has an incredible Christian faith which is carrying her thru this time. Big hugs and hope you have a lovely week despite this sad news.
Joanne
Veronica! They are fabulous!!
A wonderful tutorial, and what a fabulous teacher you have 🙂
The little bird is so sweet.
xx
Veronica
Thank you so much Joanne. I thought of you and my sweet bird ring you sent me when I drew that bird. 😀
Eileen
Lovely pieces! You are so creative!
Veronica
Thank you so much Eileen. I really like working with the silver. 😀
Christie
Oh my…these are spectacular! Walt is certainly a wonderful teacher. I’m amazed that you could complete these two (really four) rings in one day. Well done!
Veronica
Thank you Christie. They do look very homemade…lol, but I like that non-professional look. When I was walking out of the studio Walt did say they need a bit more work and I agree. More filing and more polishing and generally a little more tweaking. Need to go buy some more tools first. 😀
debr @ frugal little bungalow
As I followed along I thought “how in the world she managed to take pictures as well is beyond me ” but I am glad that you did! 🙂 These are lovely / no wonder she wants a necklace now and I am sure that earrings may be required down the line ? 🙂 Or a bracelet. Yes, a mother might have more work cut out for her…:)
Veronica
Thank you so much Debra. 😀 I was just telling Walt that I’d love to learn how to make jump rings and such to make necklaces. That’ll be fun. Oh, and I love bracelets! Maybe that should be the next thing. 🙂
daryledelstein
coveting the ring on your thumb ..
Veronica
Are you? Then, when I get some silver and a few more tools, I’ll make you one. 😀 (It’ll look very homemade!)
Carol Cook
You make the whole ring process look so easy. I have a few metal tools and bought some metal strips, but I have yet to make anything. I guess I just need to do it.
Your ring is beautiful.
Veronica
Hello Carol, why don’t we try a few things and then bounce the experience off each other? I’d love that and I’d love to see what you make. 😀 We can be “we-have-very-little-idea-of-what-we-are-doing-but-how-hard-can-it-be?” friends.
My Irish Cottage Homebetty
I have seen the rings on tv, but never up close. Yours is so pretty and one of my favorite stones is carnelian.
dawnsrays
Oh wow! those are great and I love the wavy branch and the pretty stone. What a great piece!
~Dawn
Nancy
I admire your work so much. The bird and leaves are so dainty. Silversmithing is a real talent, and your ring is beautiful.
Rainey
Lots of work… so creative.
Sarav
Veronica, so incredibly cool!!! I love that you put a bird flying around your ring–and Sitka Spruce? So elegant and perfect.. Your talent knows no bounds apparently 🙂
eganj1
lovely rings, great job
Carol Early Cooney
So cool! I was looking at spinner rings last week at Etsy. Yours are so wonderfully creative! Now I really want one!
gillian
Oh those rings are awesome and I love the idea that you can twirl one on top of the other. I have always yearned to make jewelry. You are so talented and it sounds as though you have a great teacher who can implement your ideas. I look forward to seeing more of your work.
Veronica
Hi Gillian, thank you so much. I bet you could make some silver jewellery if you try. I tried watching some videos etc, but once I took the basic class, all the info fell into place easily. I’m looking forward to working with some silver at home now. 🙂 Big hugs form me all the way to you on the other side of the world. 😀
artful affirmations
Oh my Veronica! What an amazing and inspiring class! Your rings are looking wonderful! I have seen these rings and love them too. You did a totally gorgeous job on yours! Thank you so much for sharing with us how you did yours.
Hugs,
Terri
Veronica
Thank you so much Terri. I’m so lucky to have found Walt’s class to learn this stuff in. I thought it was overwhelming, you know, when you see a video on Youtube or read about it, but, in fact, it’s pretty basic and doable once you try. Slowly but surly. I really want to learn the lost wax method next. 😀
Johanna
Hi Veronica,
I admire your skills as silversmith. What a sweet idea to make the branch with leaves an bird. Such a fancy ring is just perfect for spring. Have fun with your jewelry.
Best greetings, Johanna
brenda
hi..good for you and your creativity..would you be able to give me contact info of your teacher walt please? I should check where you live..you said lower mainland which I take to mean vancouver bc area?
I love working on my silver but am so frustrated by the spinner ring..I have such a hard time to make it flare especially..also cant figure out the measurements so it fits when completed!
thanks
brenda